Travel planning can be a super overwhelming process, even for someone like me who has basically been doing it for a living for the past three years. There are so many different things to think about when planning a trip — where to stay, how many days to spend in a destination, how you’ll get from point A to B efficiently, etc. Sometimes it can almost make you not want to go at all! That’s why I’m giving you all the deets on my Google Maps trip planner method, which makes itinerary crafting a cinch.
I’m all about getting you guys inspired to go on that trip, because if it’s the trip that changes your outlook on the world and maybe even your life, then it’s SO worth getting past all those travel planning woes!
In this post I’m sharing my secret tool that’s helped me take an overwhelming process and made it as efficient and enjoyable (yes, I said enjoyable!) as possible. The best part is that it’s free, accessible to anyone with a computer and smart phone, and it’s simple to use once you know the basics.
Meet my BFF, Google Maps aka my ultimate trip planner.
I know, I know, you were expecting something more mind blowing right? We all use Google on pretty much a daily basis, but I’m willing to bet that many of you have never used their maps functionality in the way that I’m about to show you.
Whether you want to use this tool as your vacation itinerary planner, a trip route planner on a road trip or just as a way to save ideas for a future adventure, you’ll learn all of the tools you need in the post below. But first I want to share with you a little bit about why I love this tool so much.
Why I Plan All My Trips With Google Maps
1. It helps you visualize your trip
You can make all the lists, Pinterest boards and sticky notes you want to help you plan a trip itinerary, but in my experience there’s nothing that helps you wrap your head around it all quite like seeing things visually on a map.
I’ve always been a creative and visual person as it is, but I truly believe that this method will help even those super left-brained people out there plan a trip more efficiently and with ease.
2. It helps you determine where to spend most of your time
Have you ever booked a sick hotel in a new city only to find out that it’s an hour away from most of the things you want to do during your trip? Unless you’ve planned out your trip using a map, you likely have no idea what streets are next to what and it can be difficult to visualize where all your bucket list activities are located.
Using Google Maps solves this problem by giving you a quick overview of the neighborhoods where the bulk of your planned activities live so you can plan accordingly.
3. It reduces the element of surprise (in a good way)
I hate showing up to a destination where I’m looking forward to one particular site or activity, only to discover that it’s much farther away than I anticipated.
A perfect example of this was on my recent trip to the San Pedro de Atacama region of northern Chile back in November. I had made a list of all the things I wanted to see during my trip based on inspiration I had gathered from google searches, Pinterest and Instagram.
It wasn’t until I plugged in all the data into my Google Map for Chile that I noticed one of the top things I was looking forward to (The Mano del Desierto, which is basically this giant hand sculpture rising out of the sand) was in reality a 4 hour one way drive away from everything else on our list.
In the end, it really didn’t make sense to make the drive out there just for this one site since we were limited on time — I’m just glad we knew this information ahead of time so we weren’t left disappointed during the trip.
4. It allows you to plan how many days you realistically need in a destination
Gathering all of your must-dos in one place and then mapping them out will give you a much better sense of what can realistically be accomplished in a certain timeframe. This is especially helpful for trips that involve multiple locations such as a road trip, or an itinerary that involves several cities or islands.
If you suddenly see that most of your location pins are gathered in one central area, you might consider spending longer in that town or region.
5. You get additional contact information baked in
One of the most genius features of Google Maps is that because Google already houses so much information about a destination, this automatically gets linked up to your location marker if it’s a place that already exists on Google (most of them are).
This makes it super easy to do things like book dinner reservations, call museums to inquire about tickets, etc and saves you the extra legwork to search for this information yourself.
6. You can use it seamlessly between devices
By downloading the Google Maps app on your phone (you likely already have it if you’ve ever needed driving directions), you can seamlessly create your map on your computer and then use it via your phone in your destination. This app goes beyond just the travel planning phase — it’s super functional in the moment as well.
7. It’s customizable
Google Maps allows you to add in your own notes for each location marker to help you remember important details.
So if you want to remember which friend recommended a particular tour company or that x restaurant was rated #1 in the city by Travel & Leisure, you can include all that information in your custom notes.
Other customizations like categories, color coding, icons, etc give you the ability to personalize your map and make it work best for your needs.
8. It works well for group travel
If you’ve ever tried to manage the trip planning for a group, you know that attempting to cater to the wants and desires of multiple travelers is enough to make your head spin.
Google Maps makes this process way easier by allowing you to share your map with friends and give them editing access, so that your travel buddies can all combine their must-dos in one place.
9. It makes your trips more efficient
Perhaps my #1 reason for organizing my itineraries with Google My Maps is that it cuts down big time on inefficiencies like driving back and forth across a city (I learned this the hard way on my trip to Mexico City which is massive and is known for horrific traffic).
By grouping activities together on your itinerary that are in close proximity to one another, you’ll avoid spending unnecessary amounts of time in transit plus save money on transport in the process.
A Step-by-Step Guide to Using Google Maps as a Trip Planner
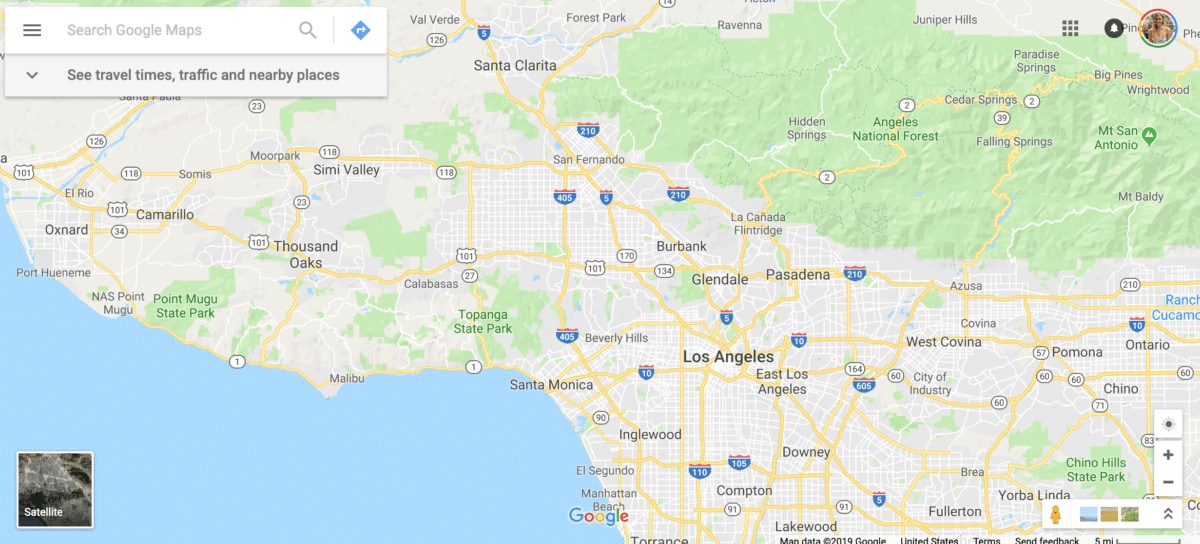
There are so many ways to use Google Maps for travel, from storing ideas for potential future trips to creating a custom itinerary. In this post I’m going to show you exactly how I use Google Maps as a trip planning tool to make my trips run as smooth as possible and ensure I don’t miss anything on my to-do list.
Step 1: Create a new Google Map
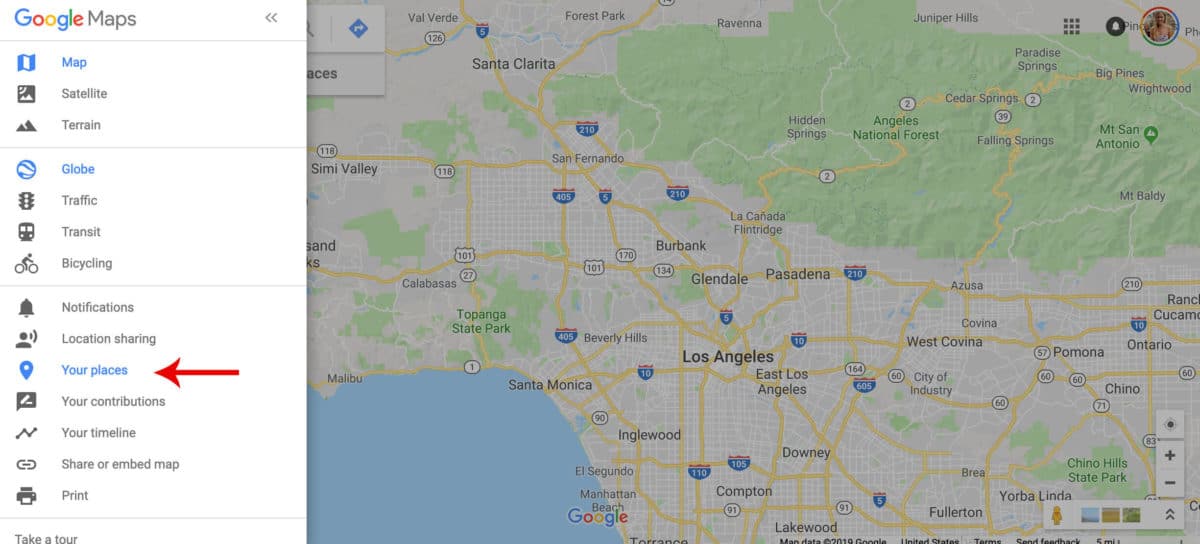
To create a new Google Map, visit this link where you’ll be brought to a general map page. If you’re not already signed into a Google account, make sure to do this. You’ll then want to click the hamburger menu in the top left hand corner and select “Your Places” from the dropdown.
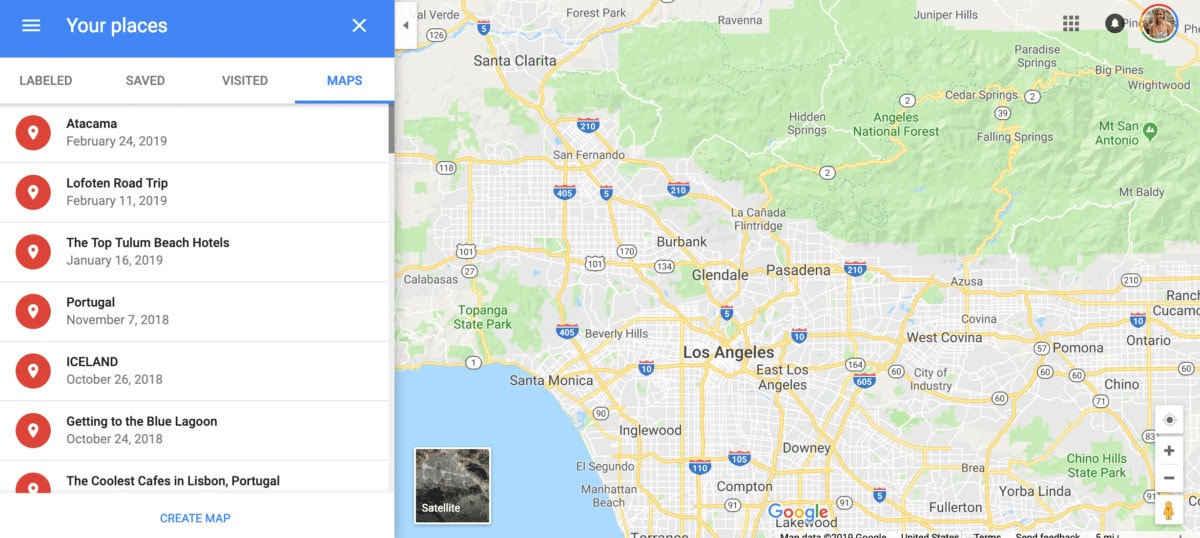
Next, click on the “Maps” tab on the right hand side of the menu. If you’ve already created custom maps like I have, then you’ll see a list of your maps here. If not, this area should be empty. Click the “Create Map” button at the bottom of the menu.
At this point, you’ll be brought to an Untitled Map with a blank menu that should look something like the below.
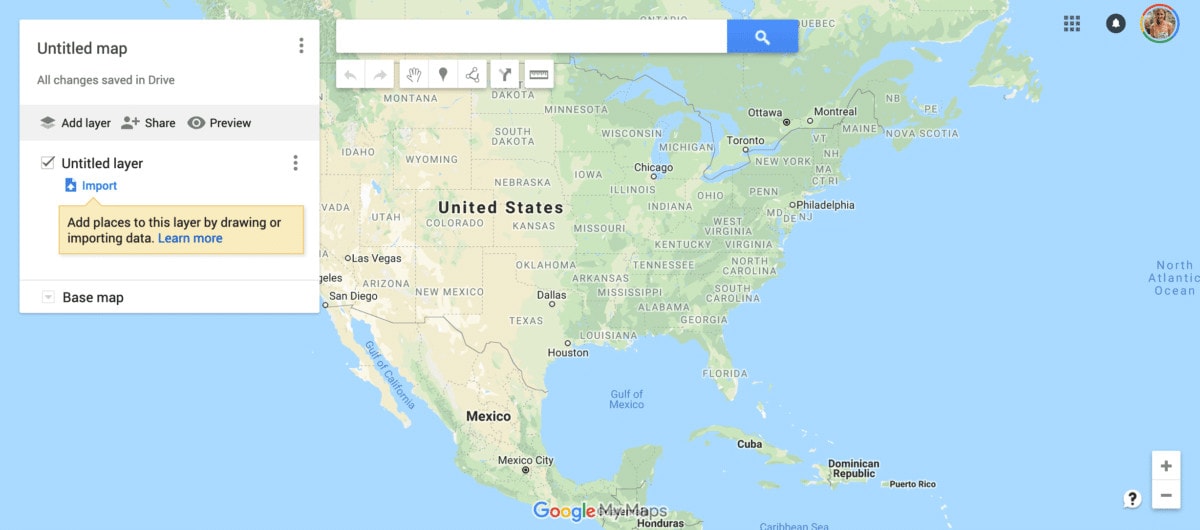
To give your map a name, click on “Untitled Map” and a text box will show up that allows you to assign a name and description to your map.
Whoop whoop! You’ve just created your first map.
Step 2: Breaking your map down into categories
This might seem out of order, but it’s important to do this step before you start gathering all of the inspiration for your trip, because it’s easier and more efficient to input categories and color coding for each item as you input rather than organizing later.
Start by thinking about the purpose of your trip and the types of things you like to do when traveling. Are you an avid hiker? A food snob? A shopaholic? Your interests should inform the categories that you and your travel buddies choose for your maps.
I recommend limiting your categories to 10, because as of writing this, Google Maps only allows 10 layers per map. You can create additional sub-categories using other methods as I’ll discuss below.
The Categories That Have Worked For Me
Throughout the course of my travels, I’ve found that the following categories work pretty well for me and are quite all-encompassing. If you’re staying for a long time in a place or if your list is quite extensive, you may want to break down the categories even further.
- Food & Drink: You can break this down even further into cafes, bars, restaurants if you desire
- Towns: This is a great category add if you’re covering a lot of ground in a particular state or country or are going on a road trip (adding town markers will also help simplify your directions as I’ll explain later).
- Sites & Activities: Include in here things like museums, tours, viewpoints, historic sites and meeting points for activities like kayaking, hiking, walking tours, etc.
- Hotels: This is a great place to include all the hotels you’re deciding between and will help you see where they’re all located in relation to the items on your must-see list.
- Shopping: Include markets, boutiques, or any other shopping recommendations.
To give you additional ideas, other categories you might want depending on your travel style could include: Essentials (grocery stores, laundromats, drugstores), coffee shops, beaches, hikes, photography spots, camping sites, etc. You can break it down any way you’d like!
How to Add Your Categories
Once you’ve decided which categories you want to include on your map, you need to create a layer for each. You can do this easily by clicking on “Add Layer” in the gray bar on your map and then naming that new “Untitled Layer” with your category of choice.
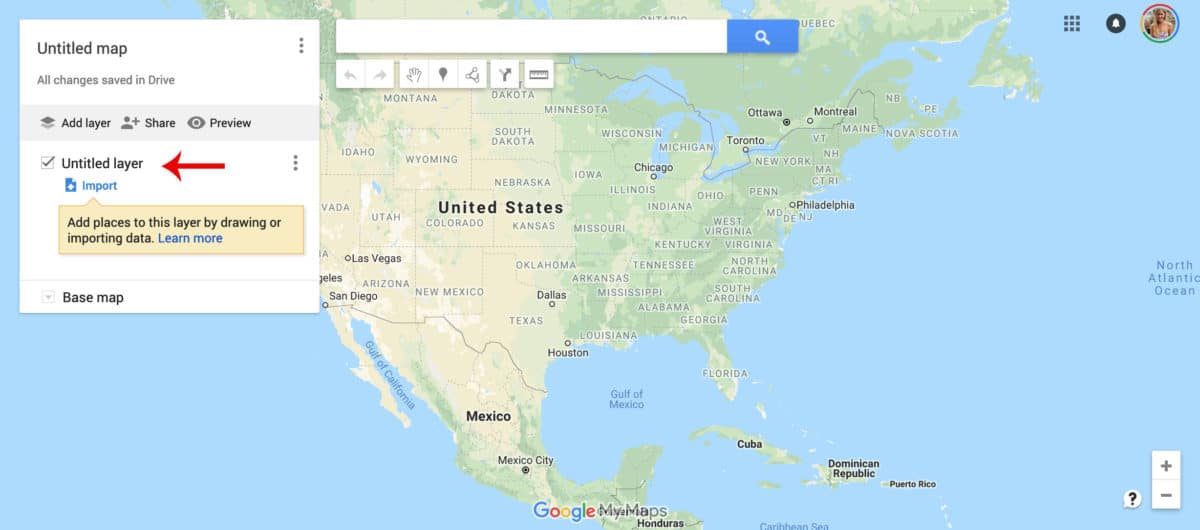
Step 3: Gather inspiration
Now for the fun part — gathering all of your inspiration! Of course some of this will come over time and you can add to your map later in the process as well. Don’t feel like you have to do it all at once! However, to get things started, you’ll want a handful of items so you can populate your map a bit.
Some of my favorite ways to gather inspiration for a trip are to start with a basic google search, peruse blogs and articles from sites like Travel & Leisure and The Venue Report and do some keyword and location searches on Pinterest and Instagram.
Once you have a group of suggestions you want to save for your trip, you’ll want to input all of them onto your Google map.
Step 4: Input your inspiration onto your map
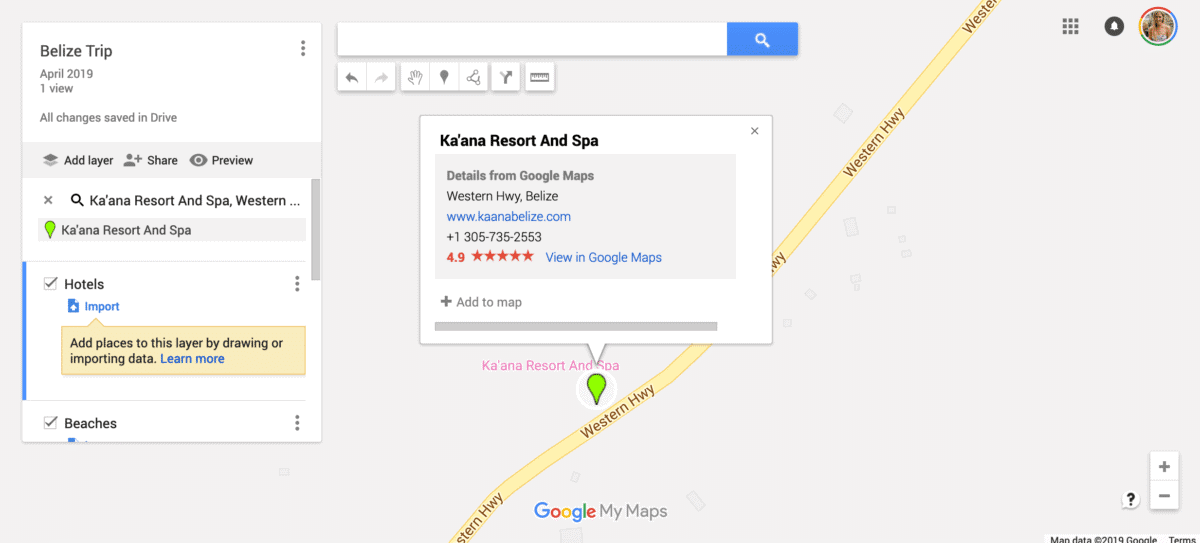
To input your first item, click on the layer (ie. category) in which you want to add that location marker. For example, if I want to add a super cute boutique hotel onto my map, I would scroll in the menu to my “Hotel” layer and then click on it so that the left side panel is highlighted in blue. This ensures that your marker will be added to the correct category.
Next, type or paste your item in the search box and then select the matching listing when it populates in the dropdown. Finally, in the box that pops up for your listing, click the “Add to Map” button at the bottom. You’ll see that a marker appears on your map.
What if my location doesn’t exist on Google yet?
If nothing pops up for your item, that either means your internet connection sucks 😉 OR Google hasn’t created a location for this place yet. In that case, you’ll have to find out the address manually and insert it in the search box and finally add your own name to properly mark it.
How to customize your location markers
Now, it’s time to add additional customizations to your map. There are several options including changing colors, adding icons, notes, videos and images. You can do this all using the buttons on the bottom of each location marker’s pop-up box.
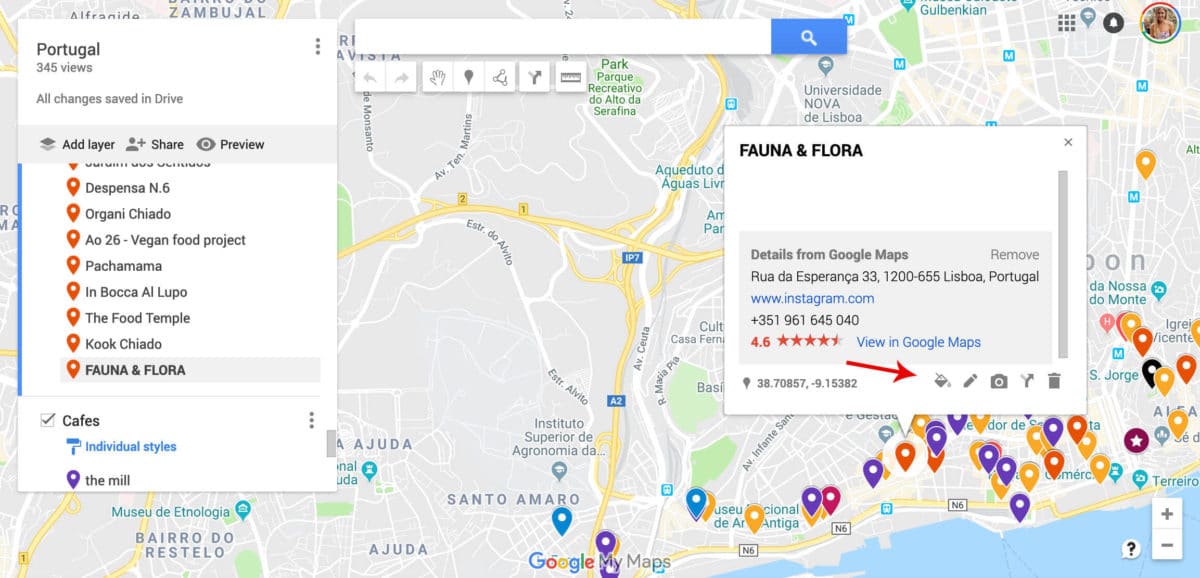
To add photos or videos use the camera icon. For color coding and to get creative with icons, click on the paint bucket button. To make additional notes for each location marker, click on the pencil.
If you ever need to delete an item, simply click on the trash icon in the pop-up box to erase it from your map.
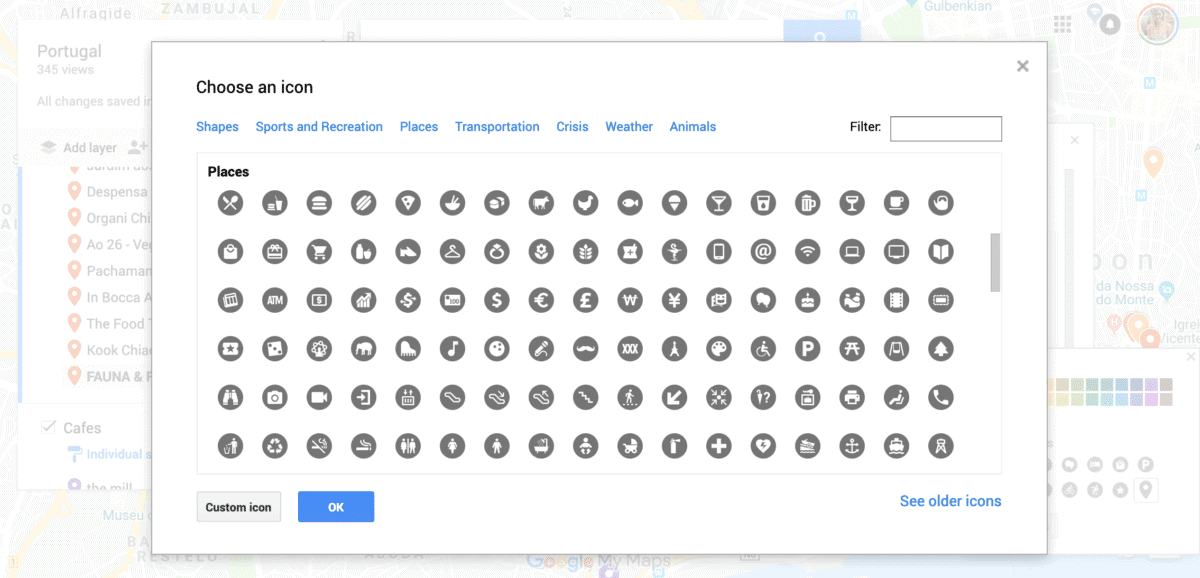
Ideas for creative customizations
I personally like to color code my location markers based on the category, but this method can also be used to further break down items into sub-categories without having to add too many layers.
For example, in your Food & Drink category, you could color code bars, restaurants, coffee shops and breweries all in different colors to help you differentiate between the listings. Or you could add different icons for each sub-category.
Another way to utilize these features would be to assign different colors for varying levels of importance. So if you have 30 restaurant recommendations for your trip to Lisbon and know you won’t get to all of them, you could color code the top 10 in yellow and the rest in blue to make sure you know which ones are highest priority with one simple glance.
Once you’ve assigned any colors, notes and icons into the listing, save the listing and you’ll see it’s been added to your layer. You’ll see that in most cases, things like the company’s website, phone number, address and rating will already be embedded into the box — so easy!
Finalizing your map’s customizations
Follow the above steps for all of the rest of your locations until you feel like you’ve gathered enough spots to make your trip the best it can be. I find it’s best to not go too crazy and edit down what you are willing to add to your map. We’re trying to reduce overwhelm here, so don’t just add any old thing you read about to your map — really decide if this is something that will excite you on your trip!
Step 5: Start building out your itinerary
Now that you have a ton of cool spots to explore in your next destination, you want to use the map you’ve built to create an epic and easy-to-follow itinerary. The way that I go about this is by breaking down the items I’ve added to my map by neighborhood and proximity to one another.
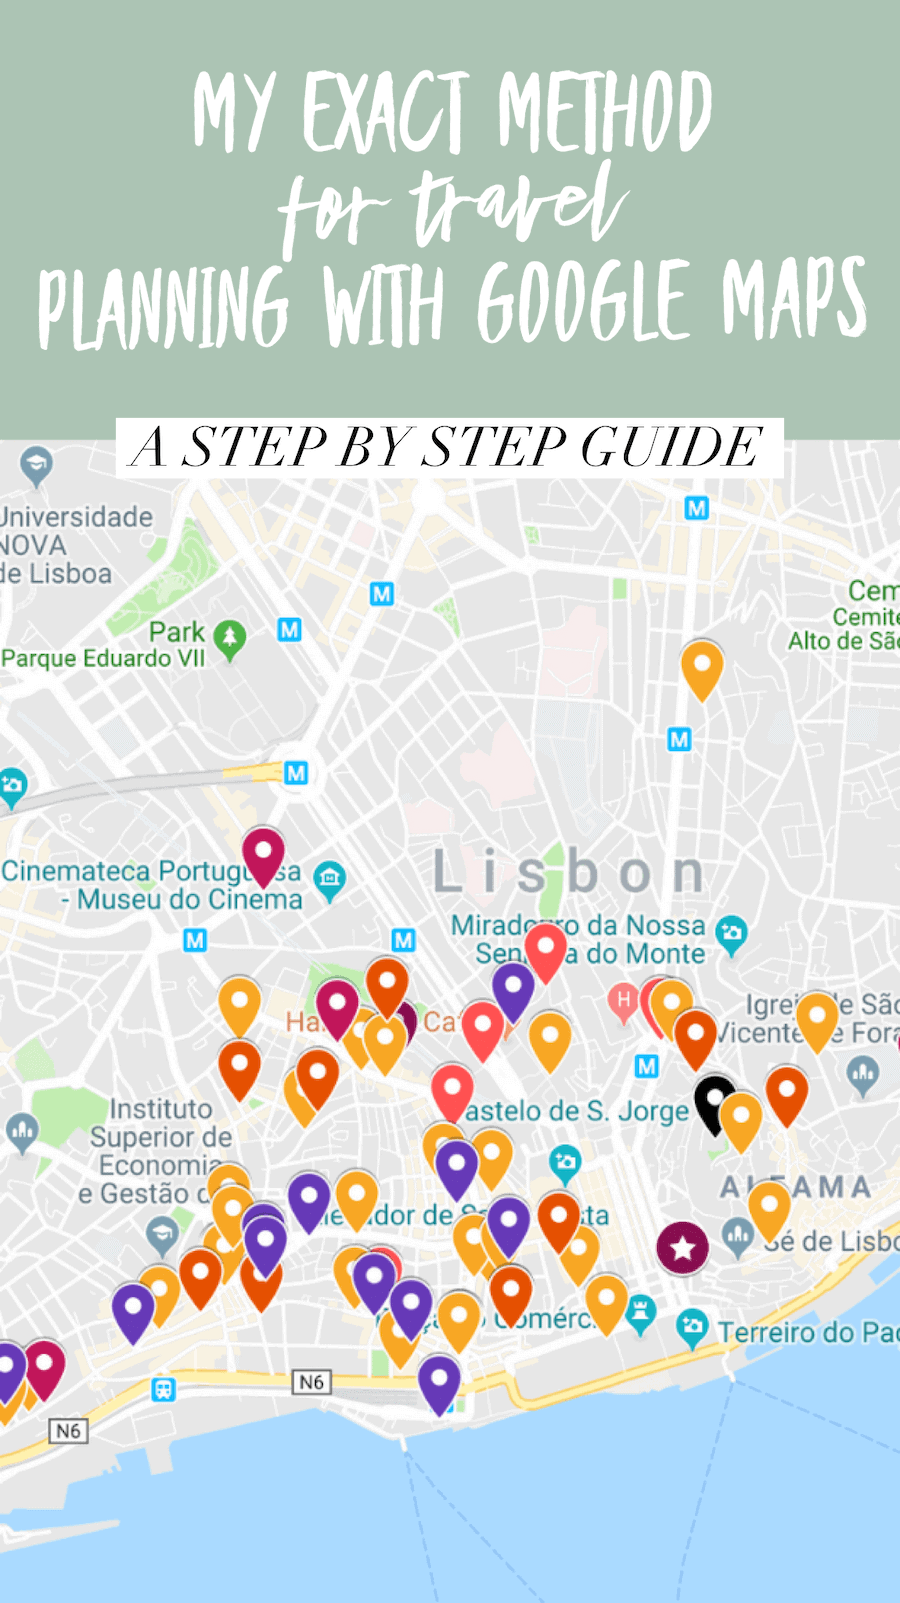
You can see in my map of Lisbon, Portugal below that while my markers are pretty evenly distributed throughout the city, there are a lot of things that are grouped very close to one another. For efficiency’s sake, I prefer to check these things out in the same day if possible so that I don’t waste time (and money) taking Ubers or public transport back and forth across the city unnecessarily.
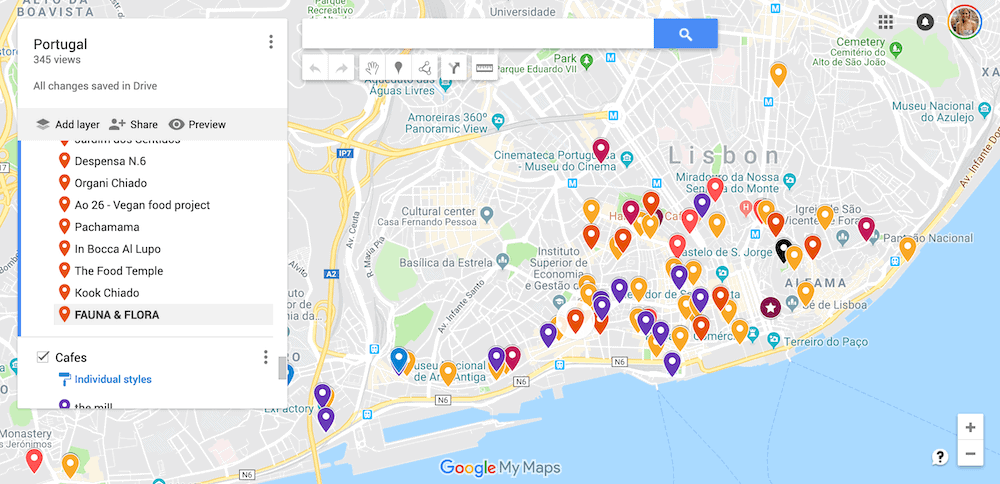
For road trips, these maps are especially helpful in getting you to visualize your route and where your most important stops should be, as well as distances between each. This knowledge can help you better decide how many days you want to spend in a destination, how many stops you should have on your road trip, etc.
Get out a piece of paper and start to write down groupings of items that make sense to do in the same day based on their proximity to one another. Once you feel like you have a pretty good outline of how many days you need and what you’ll do each day, move on to the next step.
Step 6: Get directions and distances
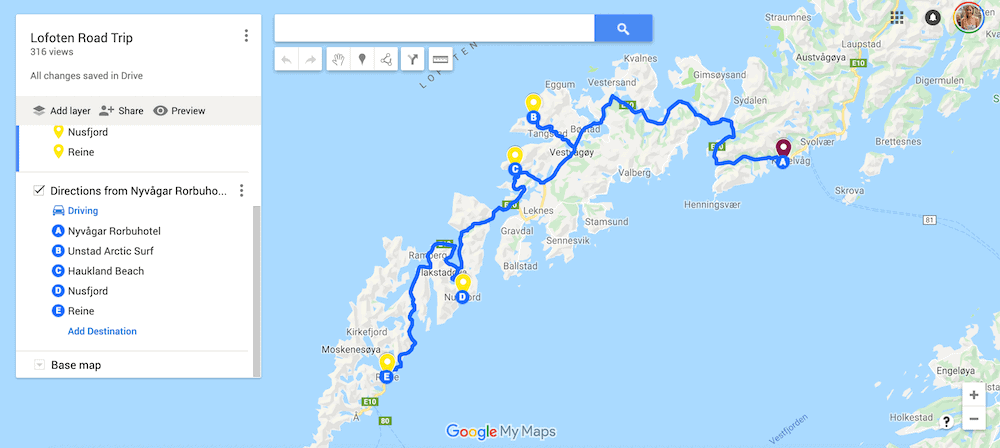
If you’re going on a road trip or just want to know how far things are from one another, you can do this on your desktop map to help inform your itinerary.
To do this, click on an item in your map you want directions to, then click on the arrow icon next to the trash can on the pop-up box. This will automatically create a new layer for directions.
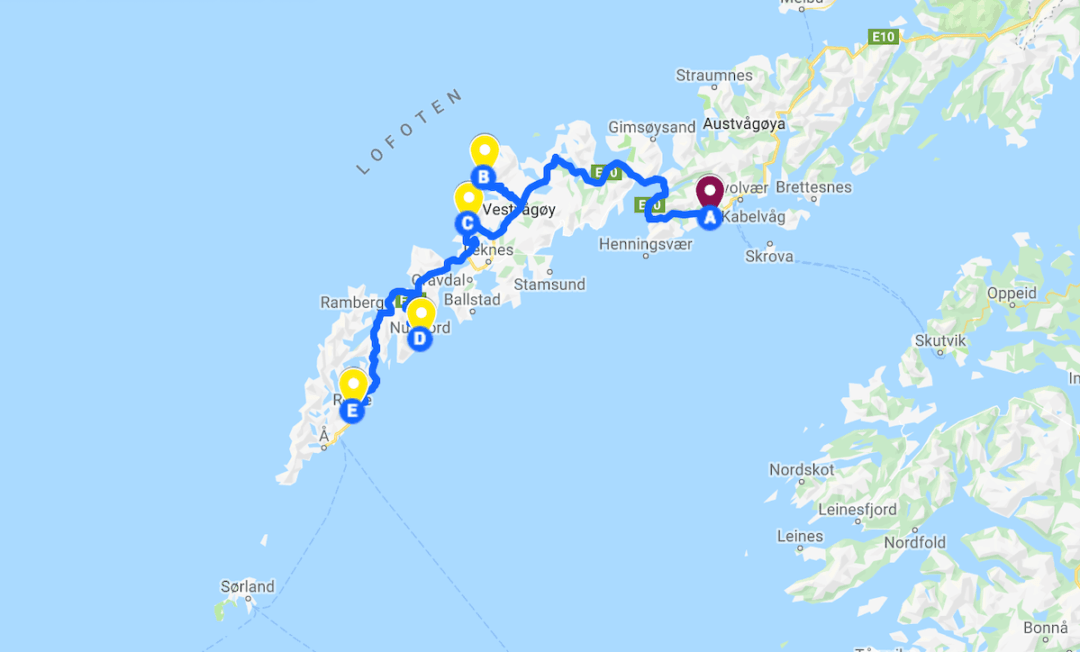
You will need to add in your starting point into the layer you’ve created for the directions. Once you’ve selected this, you should see a new blue path populate on your map from point A to point B. You can continue adding additional stops to this directions list as well by clicking “Add Destination.” You can also click on the transport icon in the layer to change your directions from driving to biking or walking.
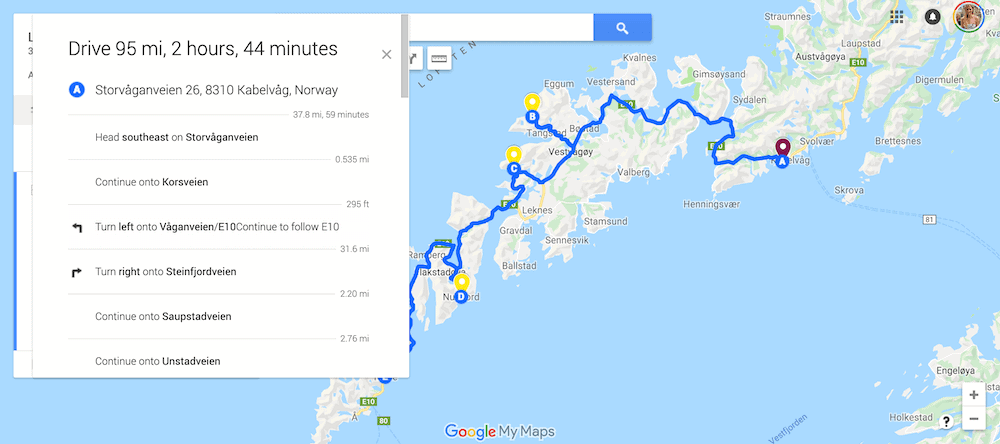
To get the actual step-by-step directions and timing, click on the three dots on the directions layer and select “Step by Step Directions.” You’ll see a box pop-up (like above) that gives you the route along with the total mileage and driving time.
Maps can sometimes be deceiving, so I always check this information to make sure I have a correct idea of the time it will take me to get between places.
Step 7: Finalize your official itinerary
One thing I don’t like about Google Maps currently is that they only allow for 10 total layers, so there are some limitations with what you can do to actually organize your day to day itinerary.
When I want a very rigid itinerary (which isn’t too often), I tend to actually create two maps — the first one being the one discussed above where I gather all of my information and inspiration. The second map would actually be my day to day itinerary that would get set up with each day as its own layer. The location markers would get organized within each corresponding day’s layer and then I would move them into the proper order of how I want my day to unfold. If you prefer to write out your actual day to day plan, Google Docs is also a great place to do this that can be accessed via your phone.
If you really want to keep everything on the original map you created, you can choose to color code each day individually to break down what to do and see together on the same day.
Step 8: Book accommodation
Now that you can see where you’ll be spending the bulk of your time, you can choose your accommodation accordingly. I like to book my accommodation after I’ve gone through this whole process because it helps me to feel better informed as to what location is most convenient.
Sometimes the highest rated or cutest hotels aren’t necessarily in the best location, so seeing your itinerary visually will help you better decide where to stay.
I love using Booking.com for all of my hotel bookings because they have so many filters you can use to literally find the perfect accommodation for your needs. Airbnb is also a favorite if I’m looking for a more affordable and homey stay.
Step 9: Share your map with travel buddies
Have friends joining you on your trip? You can share it with them so that you can both contribute to the travel planning process.
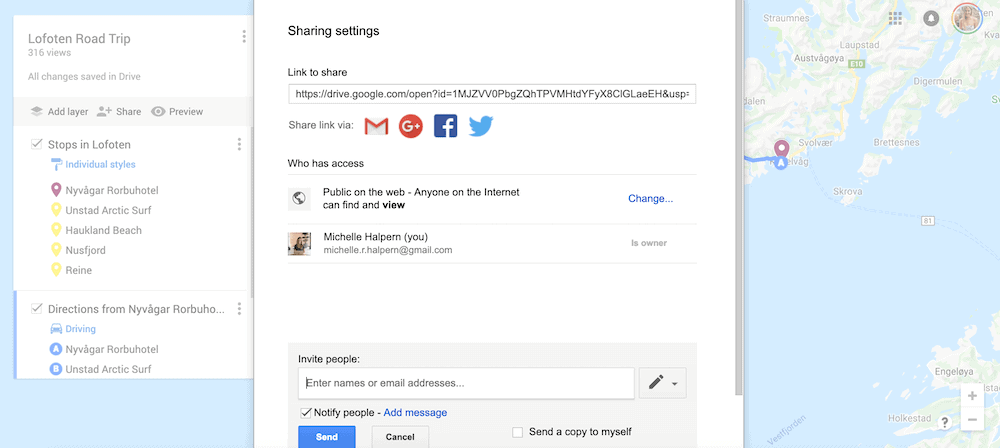
To share your map with friends, click on the “Share” button under the main title of your map. Then at the bottom of the pop-up box, add your friends’ email addresses into the “Invite People” bar. On the right hand side where the pencil icon is, make sure that “Can Edit” is selected. Then press Send.
Step 10: Access your maps on your phone
Congrats! You’ve created an epic map and itinerary to help you have the best trip ever. Now, don’t miss this last step which so many people forget to do before getting to a destination.
If you want to be able to access your maps on the go via your mobile device, you need to make sure you have the Google Maps app downloaded. You’ve likely already used it before for directions in the past.
Once downloaded, make sure you are signed in to your google account on your phone or else your personalized maps won’t populate. After signing in, click on the hamburger menu in the top left hand corner of the app and select “Your Places.” Then click on “Maps” on the right hand side of the menu. Here you can select the map of choice.
Accessing Your Maps Offline
If you know you’ll be traveling in a place where you won’t have good cell service, the best way to access your maps offline will be through the Google Earth app, which in my opinion is even cooler because you can actually see a visual of what the areas look like from the satellite footage.
To access your Google My Maps offline, follow the below steps:
-
- First download the Google Earth app on your phone.
- Navigate to your Google Maps trip planner on your desktop, click on the three dots next to your map’s title and select “Export to KML/KMZ.”
- In the pop-up, leave the boxes unchecked and just click on Download.
- From here, you can email the downloaded file to yourself and open that email up from your phone.
- When downloading the file onto your phone, you will have to select the Google Earth app option to open it there.
Please note: If you’ll need to access information like addresses, directions and things of that nature during your trip, make sure to copy that information into the notes section so that you can still get to it offline as the auto-populated contact info won’t show up when you’re without service.
Now get to travel planning!
Phew, that was a lot. But I hope you found this article super helpful for planning your next trip. Google My Maps is honestly one of the best trip planning tools I’ve found and I can’t wait to see how you use it to plan your next trip. Please share this if you found it helpful and feel free to ask any questions in the comments below!
Planning a trip right now? These are all the websites and services I love for booking everything from flights, tours, accommodation and more:
- Booking.com for the best hotel deals
- World Nomads for travel insurance
- Airbnb for awesome home rentals
- Intrepid Travel for group travel
- Skyscanner for finding the best flight deals
- Hostelworld for budget accommodation
- Rentalcars.com for easy car rentals
READ MORE
How I Saved $1,500 with Travel Insurance
15 Essential Travel Apps You Need For Your Next Trip
Actionable Tips and Tricks for Traveling More This Year
***
FOUND THIS POST HELPFUL? SHARE IT ON PINTEREST






No Comments